
Choose the Vent Route First—Then Build the Right Parts List
Choose the route, use the stove’s sizing method for 3- or 4-inch vent, then audit the exact SKU for pipe, supports, penetration parts and cap.
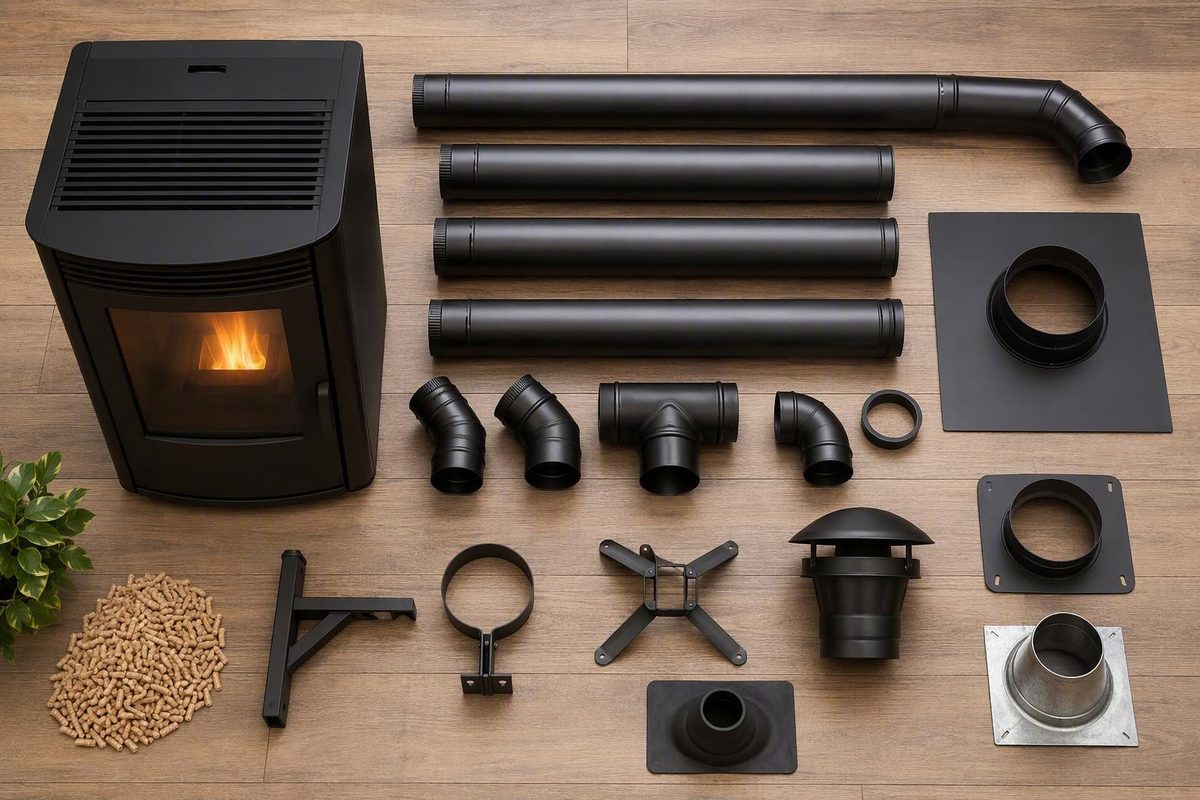
The right pellet stove vent kit is the one that fits an appliance-approved design—not merely the box whose diameter matches the stove outlet. Record the exact stove model and fuel, choose the route, apply the stove manufacturer’s sizing method, and audit every included part. Before buying, compare the finished list with the current appliance manual, the current manual for the exact vent system, and local permit and inspection requirements.
The five checks to make before buying a vent kit
Start with the stove’s data plate and current installation manual. Record the exact model and approved fuel, then confirm the permitted vent type, diameter, route, and restrictions before browsing kits. Pellet vent is commonly available in 3-inch and 4-inch systems, but matching the outlet alone does not establish the correct size for the proposed run (DuraVent PelletVent catalog).
Use this five-item check:
- Stove model and outlet: Record the complete make and model, approved fuel, flue-collar location, and outlet diameter.
- Approved vent product family: Identify the listed vent type and any brand or product family required by the appliance instructions. A “listed” system is tested and approved as a defined set of compatible components—not as a collection of same-diameter parts.
- Route: Choose horizontal through-wall, interior vertical, exterior vertical rise, cathedral ceiling, masonry chimney, or fireplace installation.
- Measured run and fittings: Measure horizontal length, vertical rise, wall thickness, roof pitch, and every planned elbow, tee, adapter, and offset.
- Local approval: Ask the local building or fire authority about permits, location restrictions, and inspections before finalizing the order.
The stove manual may size the vent using total run, elbows, offsets, vertical rise, appliance output, elevation, and route limits—not just the flue collar. It may also prohibit a layout that appears physically possible in the room. DuraVent’s PelletVent guidance directs installers to the appliance instructions for permitted configurations, sizing, maximum horizontal run, vertical-rise limits, offsets, and additional clearances.
Treat a packaged kit as a starting set. It may omit straight pipe, clean-out access, supports, an attic shield, roof components, or outside-air equipment. Obtain the current manuals for both the appliance and the exact vent family; a retailer description may accurately list what is in the box without establishing that the box completes your installation.
Pick the route: horizontal, vertical, exterior rise, or chimney liner
Choose the physical route before choosing a kit. Horizontal and vertical venting are not universally better or worse. The appropriate route depends on the stove, termination location, building construction, cleaning access, and configurations permitted by the manuals.
| Route | Commonly required parts | Site details to check |
|---|---|---|
| Horizontal through wall | Appliance adapter, listed pipe, wall thimble, horizontal cap, and any required clean-out or support | Wall construction and thickness, openings, grade, termination location, permitted horizontal run |
| Interior vertical through roof | Adapter, pipe and fittings, ceiling support or firestop, attic shield where applicable, flashing, storm collar, vertical cap | Ceiling and attic construction, roof pitch, offsets, support points, roof termination |
| Through wall with exterior rise | Horizontal-route parts plus tee or clean-out access, vertical pipe, wall supports, vertical cap | Siding, support locations, eaves, snow, cleaning access, total rise |
| Cathedral ceiling | Adapter, pipe, cathedral support box and trim, flashing, storm collar, vertical cap | Ceiling angle, framing, roof pitch, clearances, support-box placement |
| Masonry chimney or fireplace | Approved adapters, rigid pipe or listed flex where permitted, supports, termination, inspection access | Chimney condition and dimensions, smoke shelf, liner approval, clean-out access, other flues |
A basic through-wall route usually begins with an appliance adapter, listed vent pipe, wall thimble, and horizontal termination. A clean-out tee or another approved clean-out arrangement may be required by the appliance or vent instructions and can improve service access where permitted.
An interior vertical route adds components that a horizontal kit usually lacks: a ceiling support or firestop, an attic insulation shield if the vent enters an attic, roof flashing matched to the pitch, a storm collar, and a vertical cap. A cathedral ceiling requires the specified cathedral support box and trim rather than an improvised flat-ceiling arrangement.
For an exterior vertical rise, include the approved clean-out arrangement at the turn and follow the vent manufacturer’s support schedule. Do not borrow a support interval from another product family. Selkirk SPV, for example, has its own lateral and exterior-support rules and states that installed pipe length is the nominal length minus 1.75 inches for connection overlap (Selkirk SPV installation and maintenance guide).
A masonry chimney or fireplace route can require a listed liner or flex section, adapters, supports, a top termination, and inspection of the existing structure. Flexible vent is not automatically permitted everywhere. DuraVent’s PelletVent catalog permits flex for specified masonry relining but says it must not run through wall or attic spaces. Verify the exact liner, adapters, and route rather than assuming that flexible pipe is unrestricted.
Choose 3-inch or 4-inch vent without guessing
Both 3-inch and 4-inch pellet vent are widely available. The stove manufacturer’s sizing rules control which diameter the installation needs.
The outlet diameter is the starting point, not the entire calculation. A stove with a 3-inch outlet may require an approved transition to 4-inch vent for a particular design. Depending on the appliance, the sizing method may account for:
- Total horizontal run
- Total vertical rise
- Elbows, tees, and offsets
- Stove output
- Installation elevation
- Maximum or minimum route limits
There is no safe universal shortcut such as “use 3-inch below this length” or “switch to 4-inch above this elevation.” Use the table or calculation in the current stove manual.
Follow this sequence:
- Check the appliance outlet size.
- Find the vent-sizing table or method in the stove manual.
- Calculate the proposed route exactly as instructed, including fittings and changes in direction.
- Select the resulting diameter and approved product family.
- Verify every adapter, pipe section, elbow, tee, support, penetration component, and cap against that system.
When an appliance-approved design requires 4-inch vent from a 3-inch outlet, use a listed, same-system 3-to-4-inch increaser intended for that connection. DuraVent documents this transition for PelletVent Pro; the adapter makes the approved connection but does not independently establish that the installation needs 4-inch vent (DuraVent PelletVent Pro catalog).
Buying a 3-inch kit simply because the outlet measures 3 inches can leave you with the wrong diameter and the wrong bill of materials. Complete the route calculation first.
Audit the box: what a vent kit includes—and what it may leave out
Audit the exact SKU against the route, one component at a time:
- [ ] Appliance adapter
- [ ] Clean-out tee or other approved clean-out access
- [ ] Required elbows
- [ ] Enough straight pipe, measured by installed length
- [ ] Wall thimble or ceiling support
- [ ] Firestop where specified
- [ ] Wall straps, support bands, or clamps
- [ ] Attic insulation shield
- [ ] Roof flashing matched to roof pitch
- [ ] Storm collar
- [ ] Correct horizontal or vertical termination cap
- [ ] Manufacturer-specified sealant
- [ ] Separately required outside-air equipment
DuraVent PelletVent and PelletVent Pro show why the exact model family matters. The cited PelletVent horizontal kit contains a horizontal cap, a 90-degree elbow, a wall strap, five 12-inch pipe lengths, a clean-out tee, a wall thimble, and an appliance adapter (DuraVent PelletVent catalog).
By contrast, the cited PelletVent Pro horizontal kit contains a horizontal cap, wall thimble, and appliance adapter but no straight pipe lengths (DuraVent PelletVent Pro catalog). Similar names do not mean identical contents, joints, gaskets, or installation instructions.
Worked audit: DuraVent 3PVL-KME
The retailer listing for model 3PVL-KME identifies these contents:
- Four 3-by-12-inch pipe sections
- One tee with clean-out cap
- One 90-degree elbow
- One appliance adapter
- One wall strap
- One wall thimble
- One horizontal cap
Those are the contents stated for that SKU, but they do not establish that the kit completes a particular installation (3PVL-KME product listing).
The project still has to answer:
- What total installed pipe length does the route require?
- Will the wall thimble accommodate the wall’s construction and thickness?
- Does the stove permit this route and diameter?
- Is the proposed termination location allowed?
- Are additional supports required?
- Does the stove require outside combustion air or another component?
- Are additional adapters or adjustable sections necessary?
Account for overlap at joined sections. Nominal package lengths do not always equal the distance gained after assembly.
Make sure you are buying exhaust vent—not an intake kit or the wrong pipe
Marketplace results can mix complete exhaust kits with fresh-air intake tubing, individual fittings, adapters, caps, and cleaning brushes. Product titles are especially unreliable when they use “vent,” “air,” and “pipe” loosely.
An outside-air intake kit supplies combustion air to the appliance. It does not carry combustion exhaust and cannot replace the exhaust vent. Some approved coaxial systems combine intake and exhaust in one assembly, but that is a distinct system requiring appliance compatibility—not a reason to connect generic intake tubing to the exhaust outlet.
Listed double-wall pellet vent, commonly associated with UL 641 in the systems documented here, is different from ordinary single-wall stove pipe and Type B gas vent. Type B vent is intended for gas appliances and can look superficially similar to pellet vent. The cited DuraVent PelletVent instructions prohibit single-wall pipe for freestanding pellet stoves and prohibit connecting Type B gas vent with aluminum liners to pellet appliances (DuraVent PelletVent installation instructions).
Treat Class A chimney as a compatibility question as well. It may be part of an approved transition or existing-chimney design, but it is not a universal substitute for pellet vent. Obtain explicit approval and the specified adapter arrangement from the appliance and vent-system instructions.
Before adding a product to the cart, verify:
- Vent type and listing: Is it the specified pellet exhaust system?
- Fuel approval: Does the exact product cover the stove’s approved fuel?
- Diameter: Is it the size produced by the stove’s sizing method?
- Product family: Do all pieces belong to the same approved system?
- Included parts: Is there an explicit list for the exact SKU?
- Current manual: Can you obtain current manufacturer instructions for that exact line?
A rating badge, purchase count, return rate, or low price does not establish compatibility.
Compatibility and clearance rules that a retail listing cannot settle
A vent listing applies to an assembled system. DuraVent PelletVent Pro and Selkirk SPV instructions prohibit mixing their listed systems with other manufacturers’ products or improvised components. A 3-inch elbow from one family is not interchangeable merely because it appears to connect to another brand’s 3-inch pipe.
Several documented systems—including the cited DuraVent PelletVent Pro and Selkirk SPV systems—specify a 1-inch open-air clearance to combustible materials for their stated applications. That is not a universal clearance for every pellet vent, fuel, country, product generation, or installation. Selkirk also specifies that its required airspace must not be filled with insulation or other material.
DuraVent PelletVent Pro likewise requires its specified clearance to remain open and says fiberglass insulation is not approved within designated clearance areas. Its manual permits only qualifying noncombustible insulation under stated conditions and subject to acceptance by the authority having jurisdiction (DuraVent PelletVent Pro installation instructions).
Use the route-specific protective component identified by the exact vent manual:
- Wall penetration: Listed wall thimble
- Flat-ceiling penetration: Specified ceiling support or firestop
- Cathedral ceiling: Approved cathedral support box and trim
- Attic entry: Attic insulation shield
- Roof penetration: Suitable flashing and storm collar
A firestop is a listed component used where specified to preserve the required separation around vent passing through part of the building. It is not a homemade metal plate or a space packed with insulation.
Termination placement also requires a project-specific check. Distances from windows, doors, air inlets, grade, public walkways, adjacent buildings, and overhangs must come from the current appliance instructions, current vent manual, and locally adopted rules. Do not copy dimensions from an old manual or code edition and assume they apply to a different product or jurisdiction.
Before ordering the final pieces, ask the local building or fire authority about permits, location restrictions, and inspection. That conversation is cheaper before a wall or roof opening is cut.
Use this pre-purchase worksheet to build the complete order
Complete the project facts first:
| Field | Project entry |
|---|---|
| Stove make and exact model | |
| Fuel or approved fuels | |
| Outlet diameter and location | |
| Approved vent brand and product family | |
| Country and jurisdiction | |
| Site elevation | |
| Selected route | |
| Wall construction and thickness | |
| Roof pitch and roofing material | |
| Total horizontal run | |
| Total vertical rise | |
| Number and angle of elbows | |
| Tees and offsets | |
| Nearby doors, windows, air inlets, walkways, and buildings | |
| Local permit and inspection requirements |
Record every penetration:
- [ ] Exterior wall
- [ ] Flat ceiling
- [ ] Cathedral ceiling
- [ ] Attic
- [ ] Roof
- [ ] Masonry fireplace
- [ ] Masonry or prefabricated chimney
Then turn the route into a component audit:
| Required component | Included in kit | Must buy separately | Still needs confirmation |
|---|---|---|---|
| Appliance adapter | |||
| Diameter increaser, if approved | |||
| Clean-out tee or approved access | |||
| Straight pipe by installed length | |||
| Elbows and offsets | |||
| Wall thimble | |||
| Ceiling support or firestop | |||
| Cathedral support box and trim | |||
| Attic insulation shield | |||
| Wall straps or other supports | |||
| Roof flashing | |||
| Storm collar | |||
| Horizontal or vertical cap | |||
| Specified sealant | |||
| Outside-air equipment, if required | |||
| Liner and chimney adapters, if applicable |
For every adapter, pipe section, elbow, tee, support, penetration component, and termination, record the manufacturer and exact product family. Do not assume that PelletVent, PelletVent Pro, SPV, or another line can be combined.
Build the budget around the whole project rather than the box:
- Core vent kit
- Extra pipe and fittings
- Outside-air equipment, if required
- Supports, flashing, and weatherproofing
- Permit
- Qualified labor
- Inspection
- Cleaning brushes and service tools
Measure assembled length, not just the labels printed on the sections. Engagement and overlap dimensions vary by system, so use the installed-length information for the exact product family.
Stop before ordering if the proposed list does not agree with both current manuals or if a local approval question remains unresolved.
Plan for installation, inspection, and cleaning before the stove runs
Use qualified installation help if you cannot verify appliance-specific sizing, penetrations, supports, termination placement, or local requirements. The costly mistake is not usually buying one extra section of pipe; it is selecting an unapproved route or cutting the wrong opening.
Use this handoff checklist with the installer:
- [ ] Current stove and vent manuals are on site
- [ ] The vent-manual edition has been checked against the manufacturer’s current instructions
- [ ] Permit and inspection status is confirmed
- [ ] Every vent part belongs to one compatible system
- [ ] Diameter and route match the appliance sizing method
- [ ] Required clearances remain open and unobstructed
- [ ] Wall, ceiling, attic, and roof components are installed as specified
- [ ] Supports and bracing are complete
- [ ] Exterior penetrations are finished and weatherproofed
- [ ] Clean-out access remains usable
- [ ] Outside-air provisions match the appliance instructions
- [ ] Inspection and test burn are arranged
Do not apply one universal sealant rule to every twist-lock connection. In the cited PelletVent Pro manual, ordinary gasketed pipe joints generally require no added sealant, but specified appliance adapters, gasket-to-non-gasket transitions, and adjustable sections require 500°F high-temperature RTV. Follow the instructions for the exact component rather than sealing every joint—or none of them—by habit.
Have the completed system inspected and conduct the test burn under the stove instructions, vent instructions, and local process. Preserve access to the clean-out tee or other service points, and check the assembled system for signs that a joint or support needs attention.
For ongoing care, the cited PelletVent Pro manual calls for non-liquid-fuel systems to be visually inspected monthly during the heating season and cleaned at least annually. More frequent cleaning may be needed when operating conditions or buildup warrant it (DuraVent PelletVent Pro installation instructions). Keep both manuals with the stove so the installed vent system and its service requirements can still be identified years later.
Choose the route and verify the stove’s sizing rules before choosing the box. Then audit the kit line by line against the current appliance manual, current vent-system manual, and local requirements. If the diameter, product family, clearances, termination, or missing components remain uncertain, resolve them with the manufacturer, local authority, or a qualified pellet-stove installer before purchasing or cutting an opening.