
How to Clean a Burn Pot Without Damaging Your Stove
Once the stove is fully cool and disconnected, remove ash and clinkers, open every intended air passage and clear accessible debris beneath the pot.
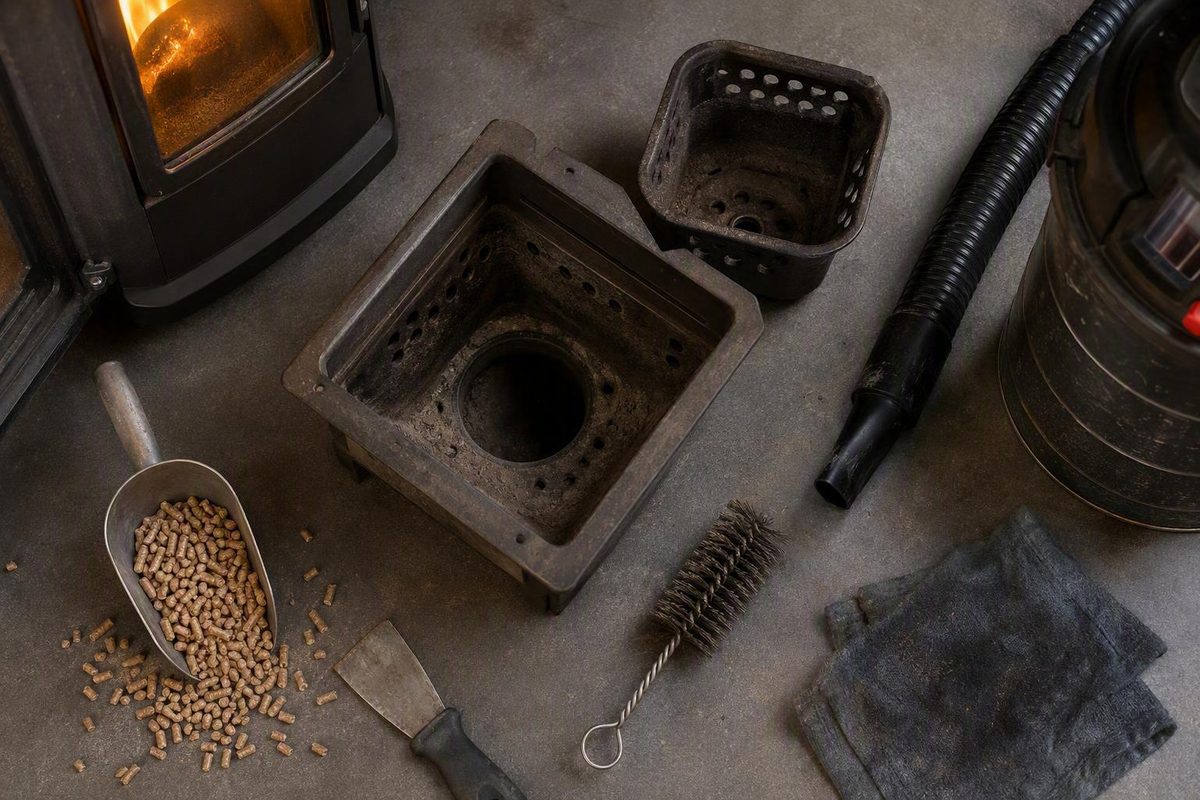
Pellet stove burn pot cleaning involves more than removing the ash visible from above. The burn pot holds the burning pellets while openings in and beneath it admit combustion air. If loose ash, fused residue, or hardened deposits obstruct those passages, the stove may struggle to ignite or maintain a stable burn.
The conservative, model-neutral approach is to follow the exact stove manual, complete the normal shutdown cycle, let the appliance cool completely, disconnect electrical power, and use only tools and procedures permitted for that model. Cleaning then means removing loose material and clinkers, scraping deposits without altering the pot, opening every intended air passage, clearing accessible debris beneath the pot, inspecting for deterioration, and reinstalling the pot correctly.
Burn-pot designs differ. This guide therefore does not prescribe a universal removal method, scraper type, hole-clearing tool, seating position, or maintenance interval. Treat it as a framework to use alongside the instructions for your specific stove.
Why the burn pot—and its airflow—must stay clear
The burn pot, sometimes called a firepot, is the chamber or grate in which pellets ignite and burn. Openings in the pot—and an airway beneath or behind it—supply the combustion air needed for that process. Their size, position, and pattern are part of the stove’s design.
Several kinds of residue can interfere with that airflow:
- Loose ash is the light residue left after combustion. It can settle in the pot, cover openings, or accumulate in the cavity below.
- A clinker is a fused mass of pellet residue or ash. Unlike loose ash, it holds together and may be too large to fall into the ash pan.
- Hardened carbon or similar adhered buildup remains attached after loose ash has been removed. It commonly requires careful scraping with an approved tool.
A deposit does not have to fill the entire pot to cause trouble. Ash can bridge small holes, and material hidden beneath a removable pot can obstruct the airway feeding those openings. A pot that looks reasonably clean from above may therefore remain restricted.
Restricted airflow is associated with poor ignition, weak or lazy orange flame behavior, soot, reduced heat, unexplained shutdowns, and unburned pellets collecting in the pot. These symptoms do not prove that the burn pot is dirty, but clearing buildup is a reasonable first diagnostic step because obstructed airflow can disrupt combustion, according to Mountain View Hearth Products’ pellet-stove cleaning guidance.
Effective cleaning may require attention to:
- The floor and walls of the pot.
- Grate bars, slots, and combustion-air holes.
- The area near the pellet-feed opening, where the manual permits access.
- The underside of a removable pot.
- The accessible cavity or airway beneath it.
- The supports or surfaces on which the pot must sit.
The objective is to restore the intended passages—not to change them. Do not enlarge, drill, grind, or reshape an opening because it appears too small or remains difficult to clear.
Start with the manual and a conservative safety routine
Unless the exact model manual provides a different procedure, use this sequence:
- Initiate the stove’s normal shutdown.
- Allow the shutdown cycle and fans to finish.
- Let the stove, burn pot, ash, and surrounding components cool completely.
- Disconnect electrical power as the manual directs.
- Review the model-specific cleaning, removal, and reinstallation instructions.
A retailer-hosted maintenance schedule begins its firepot procedure by directing owners to shut the stove down and let it cool completely before cleaning. Forge & Flame’s deeper-maintenance guidance likewise calls for cooling, powering down, unplugging, and following the owner’s manual. Together, these support a conservative shutdown-first default rather than cleaning an unidentified stove while it operates. See the retailer-hosted cleaning schedule.
Why the exact manual comes first
Burn pots are not interchangeable in construction or maintenance requirements. Depending on the stove, the pot may be:
- Fixed or intended for routine removal.
- A one-piece casting or part of a larger assembly.
- Installed in a specific orientation.
- Supported against a cradle, air tube, gasket, or other component.
- Made from a material or coating that limits tool selection.
- Subject to a daily, weekly, per-hopper, or performance-based schedule.
The manual should determine whether the pot comes out, how it is released, which surfaces may be scraped, what tool may be used in the holes, and how the pot must be reinstalled. Generic instructions cannot establish the correct procedure for every model.
Do not apply a reported operating-temperature procedure from one brand or stove to another. Without explicit instructions for the exact appliance, shut down, cool, and disconnect the stove before working in the burn-pot area.
Ash and dust precautions
Use a vacuum only after the stove and its contents have cooled completely, and only if the vacuum manufacturer permits it to collect fine, fully cold ash. The maintenance schedule cited above pairs complete cooling with ash-vacuum use; it does not support vacuuming material that is still warm.
Wear appropriate gloves and control airborne dust. A commercial pellet-stove tool guide recommends gloves, a dust mask, a stiff brush, and high-efficiency filtration because cleaning can release fine ash into the work area. Follow the protective-equipment instructions supplied with your stove and vacuum; see the pellet-stove cleaning tool guide.
Place collected ash in a metal container away from combustible materials and keep it there until completely cool. This precaution is specifically included in dealer-associated pellet-stove maintenance guidance. Do not rely on appearance alone when deciding whether ash is ready for final disposal; follow the stove manual and applicable local disposal requirements.
Tools for a routine burn-pot clean
Assemble the tools before opening the stove so ash is not left exposed while you search for equipment.
Preferred checklist
- The factory-supplied burn-pot scraper or another scraper expressly permitted by the manual.
- A small, stiff brush suitable for the pot.
- A flashlight or headlamp.
- Work gloves.
- Dust protection appropriate to the task.
- A vacuum whose manufacturer permits collection of fine, fully cold ash.
- A manual-approved wire, Allen wrench, or similar correctly sized hand tool for individual openings.
- A metal ash container.
- The exact stove manual.
Each tool performs a different job:
- The vacuum removes loose, fully cold ash and pellet debris.
- The scraper lifts clinkers and adhered deposits.
- The brush removes residue loosened by scraping.
- The small hand tool clears an individual air opening after surface deposits have been removed.
- The flashlight helps distinguish an open passage from a dark indentation or partially packed hole.
Inspect holes from more than one angle when possible. On a removable pot, checking both sides may reveal residue that is not obvious from above.
Choosing a vacuum
Do not use a general household vacuum for pellet ash. Mountain View Hearth Products recommends an ash vacuum designed to filter fine ash, while the retailer-hosted maintenance schedule specifies an ash vacuum for the cooled firepot and surrounding area.
A commercial tool guide reports that an ordinary shop-vac bag released fine ash dust indoors while a high-efficiency bag contained it more effectively. That is an owner’s experience rather than certification of every filtered shop vacuum, but it illustrates why equipment instructions and filtration specifications matter.
Conditional tools: use only when the manual allows them
Screwdrivers and wire brushes
Commercial guides and owner discussions mention flat screwdrivers and wire brushes for stubborn deposits. Their suitability cannot be generalized across different burn-pot materials, coatings, and shapes.
Use either only if the manufacturer permits it for the relevant surface. Apply controlled hand pressure, and stop if the tool appears to be changing the original surface rather than lifting residue.
Approval to use a screwdriver as a scraper does not necessarily mean it is the correct size or shape for clearing air holes. Never force an oversized tool through an opening.
Methods without model-neutral support
Owner discussions report many improvised approaches, including chisels, drill bits, powered wire wheels, soaking, soap, blasting, and aggressive scraping. Those reports concern different stoves and materials and do not establish that any of those methods is suitable for an unidentified burn pot. The range of techniques appears in this Hearth.com owner discussion, which should be treated as anecdotal context rather than manufacturer approval.
Unless the exact stove documentation expressly authorizes a method, do not improvise with:
- Hammering or striking.
- Chisels or sharpened prying tools.
- Drill bits or powered drilling.
- Powered wire wheels.
- Grinding or abrasive blasting.
- Bead blasting.
- Water, soap, solvents, or chemical cleaners.
- Torches or other high-heat treatments.
- Any process intended to cut, polish, bend, or reshape the pot.
The evidence supplied here does not establish these as universal cleaning methods. If approved dry scraping and brushing cannot remove a deposit, consult the manufacturer or dealer rather than escalating to a more aggressive technique.
Step-by-step pellet stove burn pot cleaning
This sequence is intentionally conservative. If it conflicts with the exact model manual, follow the manual.
1. Shut down, cool, disconnect, and prepare
Wait until the appliance and its contents are completely cool, then disconnect power as directed by the manufacturer.
Place the vacuum, scraper, brush, flashlight, gloves, and ash container within reach. Open the manual to the burn-pot section and verify:
- Whether the pot is removable.
- Which surfaces may be scraped.
- Which tool is specified for the openings.
- Whether any panels are part of owner maintenance.
- How the pot is oriented and seated.
- Whether a gasket or support must be checked.
2. Remove loose ash, debris, and unburned pellets
Using the manufacturer-specified method, remove loose, fully cold ash from the pot and surrounding firebox. If vacuuming is permitted, move the nozzle slowly to limit dust.
Remove loose pellets as well. A layer of unburned fuel can conceal a clinker or block your view of the bottom openings. Do not push debris into an inaccessible feed passage.
The immediate goal is visibility. Once the loose layer is gone, you can distinguish the original pot surface from material attached to it.
3. Remove the burn pot only if the manual permits it
Do not assume every pot should lift out.
If removal is permitted:
- Use the documented release or lifting method.
- Note the correct orientation before moving the pot.
- Lift only from the points identified by the manual.
- Place the pot on a stable surface appropriate for the task.
- Do not strike it against the ash container to dislodge residue.
If the pot does not move as described, stop. Confirm whether a latch, fastener, deposit, or nonremovable design is holding it rather than applying additional force.
4. Clean the accessible cavity and airway beneath the pot
When a model’s procedure permits pot removal, vacuum loose ash from the accessible cavity beneath it. Pay particular attention to the combustion-air route identified in the manual. Material in this area can continue to restrict airflow even after the upper surface and holes appear clean.
The retailer-hosted schedule cited earlier instructs owners of its covered models to remove the firepot, vacuum below it, and clear the airway underneath. That procedure is useful evidence for the importance of the lower air route, but the document also states that component placement varies by model. Do not use it to infer access points on a different stove.
Clean only owner-accessible areas identified by the manual. If reaching the airway requires removal of unfamiliar panels or components, leave that work for the model-specific service procedure.
5. Break apart and remove clinkers
A clinker may appear as a hard lump, an irregular crust, or a fused mass covering part of the pot. Unlike loose ash, it remains intact and may be too large to pass into the ash pan.
Use the supplied or approved scraper to lift the clinker or break it into removable pieces. Work from an edge when practical. Do not force the mass through the combustion-air holes.
Stop if the required force makes it difficult to distinguish the deposit from the pot itself or if the pot begins to move or flex. Ask the manufacturer or a qualified technician for model-specific advice rather than using a striking or cutting tool.
6. Scrape adhered carbon carefully
Hold the approved scraper at a controlled angle and use repeated, light passes over the surfaces identified by the manual. Remove deposits from the pot floor, walls, grate bars, and other approved areas.
Where the manual permits access near the pellet-feed opening, remove surface deposits that may obstruct normal delivery. Do not insert a tool into the auger or feed path unless the model documentation provides a specific procedure.
The aim is to remove material resting on the original surface. Do not continue if scraping appears to alter an edge, opening, coating, or the shape of the pot.
7. Inspect and clear every combustion-air opening
Do not judge cleanliness from the center of the pot alone. Check every intended hole, slot, and grate opening under strong light.
For each obstruction:
- Remove the surface deposit surrounding the opening.
- Select the manual-approved, correctly sized hand tool.
- Work gently through the existing passage.
- Remove the released material.
- Check that the opening retains its original shape.
Never drill out a hole or enlarge it to match another. Air openings may intentionally differ in size or position.
If the pot is removable, inspect its underside where the manual permits.
8. Remove loosened residue and inspect in good light
Brush or vacuum away the fragments released during scraping. Otherwise, loose pieces can settle back over the openings when the pot is moved.
Use a flashlight to inspect:
- The floor, corners, and walls.
- Grate bars and slots.
- Every intended air opening.
- The underside, if accessible.
- The accessible lower cavity and airway.
- The pot supports and seating surfaces.
- The approved area near the feed opening.
- The pot itself for obvious deterioration.
Cleaning does not require removing every discoloration or polishing the pot to bare metal. The purpose is to remove residue that interferes with its intended operation.
9. Reinstall and seat the pot exactly as directed
Return the pot to the orientation shown in the model manual and confirm that it is fully seated on its supports.
Do not invent a sealing arrangement or add foil, cement, adhesive, or gasket material unless the manufacturer specifies it. If the pot rocks, will not sit as documented, or appears damaged, remove it and determine the cause before restarting.
Finished-clean checklist
- [ ] Loose ash, debris, and unburned pellets are removed.
- [ ] No clinker remains across the pot.
- [ ] Adhered deposits have been removed without reshaping the pot.
- [ ] Every intended combustion-air opening is visibly clear.
- [ ] The accessible cavity and airway beneath the pot are clear.
- [ ] The permitted area near the feed opening is unobstructed.
- [ ] No tool, brush bristle, wire, or vacuum attachment remains inside.
- [ ] No obvious perforation or severe deterioration is visible.
- [ ] The pot is reinstalled in the position specified by the manual.
Recommended images or diagrams
A model-specific manual or reviewed companion guide is most helpful when it shows:
- Loose ash beside a fused clinker.
- Adhered residue after loose ash has been removed.
- Open and blocked air holes side by side.
- The underside of a removable pot and its accessible air cavity.
- The feed opening and limits of owner access.
- The correct supports, orientation, and seating position.
Generic photographs can help identify residue, but they should not be used to infer how a different stove’s pot is removed or installed.
How often to inspect and clean the burn pot
There is no universal cleaning interval for every pellet stove. The correct schedule depends on the model, fuel, operating hours, heat setting, ash production, and observed performance. The exact manual takes priority.
Published recommendations illustrate the variation:
- An unidentified retailer-hosted schedule classifies firepot vacuuming, underside cleaning, scraping, and hole clearing as daily tasks for the models it covers. View that daily schedule.
- ComfortBilt support suggests that newer owners begin at approximately one cleaning per hopper load, then adjust according to ash production and operating conditions. See ComfortBilt’s frequency guidance.
- Dealer-associated Forge & Flame guidance recommends weekly burn-pot cleaning while noting that some models require daily shutdown and cleaning. See its maintenance schedule.
- Walt Jensen reports scraping every few days based on one owner’s experience over twelve winters. That is an experience-based routine, not a manufacturer requirement. Read the owner account.
Do not average these intervals into a new universal rule. They concern different stoves, sources, and definitions of cleaning.
A practical starting routine for a new owner
Inspect the pot frequently at first—potentially at each hopper load if that is consistent with the manual. An inspection does not always require a complete deep cleaning; after the required shutdown and cooling, it can be a check of ash depth, clinker formation, blocked holes, and visible residue.
ComfortBilt recommends that newer owners begin around once per hopper and adjust for pellet quality, ash production, heat settings, operating conditions, and individual stove performance. It identifies restricted holes, excess ash, pellet buildup, changed ignition, and reduced flame quality as reasons to clean sooner.
Shorten the interval when:
- Air holes begin closing before the scheduled cleaning.
- Ash interferes with the fuel bed.
- Clinkers repeatedly form.
- Unburned pellets accumulate.
- Ignition changes or takes longer than normal.
- The flame becomes unusually lazy or dark for that stove.
- Heat output declines.
- The stove struggles to maintain its expected setting.
- Operating hours increase.
- A new pellet batch produces more ash.
Consider lengthening the interval only when:
- The manual permits it.
- Repeated inspections show open holes and airways.
- Ignition and flame behavior remain normal.
- Ash and clinker accumulation remain modest.
- The stove continues to deliver its expected heat.
Keep a simple burn log
A maintenance record can replace guesswork. Note:
- Cleaning date.
- Bags or hopper loads burned.
- Approximate operating hours or duty level.
- Heat setting.
- Pellet brand or batch.
- Relative ash volume.
- Clinker size and frequency.
- Ignition behavior.
- Flame behavior.
- Work performed.
After several cycles, the record may show whether a particular fuel or operating pattern corresponds with faster buildup. Treat observed changes as reasons to inspect, not as proof of a single cause.
When recurring ash or clinkers point beyond the burn pot
Rapidly returning residue does not necessarily mean the previous cleaning was inadequate. Buildup can vary with pellet ash production, fines in the fuel, heat setting, hours of operation, stove design, installation conditions, and individual stove performance.
Pellet quality should be considered cautiously. Commercial guidance associates some lower-ash or higher-quality pellets with less residue, but the supplied evidence does not establish that any grade will perform the same in every stove.
Before buying a large quantity of unfamiliar fuel, test a small amount that complies with the stove manual. Forge & Flame recommends trying a few bags before committing to a larger purchase, while emphasizing that maintenance needs vary by stove design, fuel, use, and ash capacity. Compare:
- Ash volume per bag or hopper.
- Clinker frequency and hardness.
- Number of blocked holes.
- Ignition consistency.
- Flame stability.
- Time between cleanings.
- Visible sawdust or fines in the bag.
Use a symptom-to-action sequence
If buildup returns quickly or the flame remains weak, troubleshoot in stages.
First, recheck the burn pot:
- Is the surface free of loose ash and heavy deposits?
- Is every intended opening clear?
- Is the accessible underside clean?
- Is the lower airway clear where the manual permits access?
- Is the pot seated correctly?
- Is the permitted feed-opening area unobstructed?
Next, review the broader maintenance schedule in the manual. A clean burn pot cannot compensate for restrictions elsewhere in the combustion or exhaust route. Depending on the model, relevant areas may include:
- Ash traps.
- Firebox passages.
- Air inlets.
- Heat-exchanger surfaces.
- Combustion blowers or fans.
- Exhaust passages.
- Venting and termination.
- Clean-out tees.
- Door, ash-pan, or internal gaskets.
Poor ignition, soot, low heat, shutdowns, and weak flame behavior can have multiple causes. Burn-pot cleaning is a sensible first maintenance step, not proof of the underlying fault and not a guaranteed cure.
Contact the manufacturer, dealer support, or a qualified pellet-stove technician if ash accumulates unusually quickly, ignition trouble continues, airflow still appears restricted, or flame quality remains poor after routine cleaning. ComfortBilt identifies these persistent conditions as reasons to escalate to support.
Quick burn-pot care versus deeper stove maintenance
A clean burn pot does not mean the entire stove is clean. Frequent pot care addresses the immediate fuel bed and its accessible air supply. Broader maintenance addresses the path air and exhaust take through the appliance and venting.
What a quick burn-pot routine includes
Where permitted by the manual, routine care consists of:
- Removing loose, fully cold ash and pellets.
- Removing clinkers.
- Scraping adhered deposits.
- Opening every intended air hole.
- Clearing the accessible cavity below the pot.
- Inspecting the pot and its supports.
- Reinstalling it correctly.
- Observing the next ignition and burn.
This work may be required more often than full-stove maintenance.
What deeper maintenance may include
Depending on the appliance, broader maintenance can involve:
- Ash traps and clean-out chambers.
- Firebox panels and passages.
- Heat-exchanger surfaces.
- Combustion and distribution fans.
- Combustion-blower housings.
- Exhaust channels.
- Air-inlet ducts.
- Vent pipe and termination.
- Clean-out tees.
- Door and ash-pan gaskets.
- Hopper and feed-area dust.
Some dealer-associated guidance gives annual post-season service and cleaning after approximately one ton of pellets as general examples, while also making the model manual controlling. These are not universal thresholds. Forge & Flame describes those example intervals here.
A heating-service company also recommends an autumn professional inspection that includes the burn pot and combustion chambers. This is an optional preseason practice rather than a replacement for the stove’s required schedule. See the company’s preseason inspection guidance.
Blower removal, gasket replacement, vent disassembly, and access behind unfamiliar internal panels are not suitable for a universal procedure. These tasks may require model-specific disassembly, replacement seals, or verification after reassembly. If the manual does not clearly classify the work as owner maintenance, use a qualified technician.
Inspect, restart, and know when to stop troubleshooting
Before reconnecting power, complete one final inspection.
Confirm that:
- No tools, wire, brush bristles, clinker fragments, or loose debris remain.
- Every intended opening is clear.
- The accessible lower airway is clear.
- The pot has no obvious damage.
- A removable pot is correctly oriented and fully seated.
- Any owner-removable panels are correctly reinstalled.
- Door and ash-pan components close as the manual describes.
Inspect the pot for cracks, warping, erosion, enlarged openings, missing material, and severe thinning. Mountain View Hearth Products recommends replacing a pot when it has large gaps or holes through which burning pellets could fall. That condition requires model-specific replacement advice rather than additional scraping or an improvised repair.
Treat uncertain seating, visible deformation, suspected gasket damage, or a perforated pot as reasons to stop. Do not straighten, weld, fill, grind, or seal a damaged burn pot without explicit manufacturer approval.
After reassembly, reconnect power and use the stove’s normal startup procedure. Observe:
- Whether ignition follows the usual model-specific sequence.
- Whether pellets feed and ignite as expected.
- Whether the flame becomes more stable than before cleaning.
- Whether expected heat returns.
- Whether abnormal sounds occur.
- Whether residue returns unusually quickly.
Improvement may appear as normal ignition and stronger, steadier flame behavior.
Stop troubleshooting and seek manufacturer or professional assistance if:
- Ignition or flame problems continue after accessible passages are clear.
- Airflow still appears restricted.
- The pot cannot be seated as documented.
- A crack, perforation, warp, or enlarged opening is visible.
- Buildup returns unusually quickly.
- A gasket or internal seal may require service.
- Diagnosis requires blower, vent, or unfamiliar internal disassembly.
Printable pellet stove burn pot cleaning checklist
- [ ] Consult the exact model manual.
- [ ] Complete the normal shutdown cycle.
- [ ] Let the stove and ash cool completely.
- [ ] Disconnect electrical power.
- [ ] Put on gloves and prepare dust control.
- [ ] Remove loose ash, debris, and unburned pellets.
- [ ] Remove the pot only if the manual permits it.
- [ ] Clean the accessible cavity and airway below.
- [ ] Remove clinkers with an approved scraper.
- [ ] Scrape deposits without altering the pot.
- [ ] Clear every intended air opening without enlarging it.
- [ ] Remove all loosened residue.
- [ ] Inspect for cracks, holes, warping, and erosion.
- [ ] Reinstall and seat the pot exactly as directed.
- [ ] Place ash in a metal container away from combustibles until cool.
- [ ] Check that no tools or debris remain inside.
- [ ] Follow the normal startup procedure.
- [ ] Observe ignition, flame stability, heat, noise, and recurring buildup.
- [ ] Escalate persistent problems or visible damage.
A sound routine remains manual-first: cool and disconnect the stove, remove loose ash and clinkers, scrape deposits without altering the pot, open every intended air passage, clear accessible debris below, and reinstall the pot correctly. Then observe the next ignition and burn.
Build the cleaning schedule around the model manual, actual ash production, and stove performance—not a universal calendar. Seek qualified help when rapid buildup, persistent airflow or ignition problems, uncertain disassembly, or visible damage goes beyond routine owner maintenance.
Frequently asked questions
Can I clean a pellet-stove burn pot while the stove is running?
Not as a model-neutral procedure. Unless the exact stove documentation explicitly provides otherwise, complete the normal shutdown, let the appliance cool completely, disconnect power, and follow the manual before cleaning.
Do not treat brand-specific dealer advice, owner reports, or a procedure for one model as authorization to scrape, vacuum, remove, or reach into another stove while it operates.
Can I use a regular household or shop vacuum for pellet ash?
Do not use a regular household vacuum. Use only equipment whose manufacturer explicitly permits collection of fine, fully cold ash.
A shop vacuum is not automatically suitable. Its manufacturer must authorize the intended use, and all specified bags, filters, seals, and accessories must be installed. Regardless of vacuum type, wait until the stove and ash are completely cool.
What is a clinker, and how should I remove it?
A clinker is a fused mass of pellet residue or ash. Unlike loose ash, it holds together and may be too large to fall through the pot or into the ash pan.
After shutting down, cooling, and disconnecting the stove, use the factory scraper or another manual-approved tool to lift the clinker or break it into removable pieces. Do not force it through the air holes or use an improvised striking method.
Can I soak a burn pot in water or use a chemical cleaner?
Only if the manufacturer of the exact stove explicitly approves that method. Owner reports describe soaking, soap, and other treatments, but those experiences do not establish compatibility with every burn-pot material or design.
The conservative model-neutral method is dry mechanical cleaning with approved tools: remove loose cold ash, scrape deposits carefully, brush away residue, and clear individual openings without changing them.
Why is the flame still lazy after I cleaned the burn pot?
First confirm that cleaning included more than the visible upper surface. Recheck every air hole, the underside of a removable pot, the accessible lower airway, the permitted area near the feed opening, and the pot’s seating.
If those areas are clear, consult the manual’s broader maintenance schedule. Ash traps, air inlets, heat exchangers, exhaust passages, fans, venting, clean-out areas, and gaskets may also require inspection.
A lazy flame does not prove that the burn pot is dirty, and cleaning the pot will not correct every combustion fault. If weak flame behavior, soot, reduced heat, pellet buildup, or ignition trouble persists, contact the manufacturer or a qualified pellet-stove technician.